• This is default featured slide 1 title

    Go to Blogger edit html and find these sentences.Now replace these sentences with your own descriptions.This theme is Bloggerized by Lasantha Bandara - Premiumbloggertemplates.com.

  • This is default featured slide 2 title

    Go to Blogger edit html and find these sentences.Now replace these sentences with your own descriptions.This theme is Bloggerized by Lasantha Bandara - Premiumbloggertemplates.com.

  • This is default featured slide 3 title

    Go to Blogger edit html and find these sentences.Now replace these sentences with your own descriptions.This theme is Bloggerized by Lasantha Bandara - Premiumbloggertemplates.com.

  • This is default featured slide 4 title

    Go to Blogger edit html and find these sentences.Now replace these sentences with your own descriptions.This theme is Bloggerized by Lasantha Bandara - Premiumbloggertemplates.com.

  • This is default featured slide 5 title

    Go to Blogger edit html and find these sentences.Now replace these sentences with your own descriptions.This theme is Bloggerized by Lasantha Bandara - Premiumbloggertemplates.com.

Minggu, 29 Desember 2019

UNICODE Menulis Arab Di Microsoft Word Tanpa Settingan dan Software

بِسْمِ اللّٰهِ الرَّحْمٰنِ الرَحِيْمِ
Kali ini kita akan coba menuliskan frasa huruf Arab dari “Allah“. Caranya, silahkan ikuti langkah demi langkah berikut ini:
  1. Pertama, silahkan buka Microsoft Word anda.
  2. Kemudian ketikan huruf FDF2 di halaman dokumen Microsoft Word anda. Huruf kapital atau kecil semua atau campuran tidak masalah. Jadi, mau ketik FDF2 atau fdf2 atau fDF2 atau lainnya sama saja.
  3. Setelah itu, tekan Alt+X, yakni menekan tombol Alt dan tombol X bersama-sama (berbarengan).
  4. Dan lihatlah hasilnya apa yang terjadi. Jika berhasil, huruf FDFA akan berubah menjadi (huruf Arab: Allah).
  5. Ini artinya frasa atau kata Arab ﷲ itu, kode Unicodenya adalah FDFA.

Tabel Unicode untuk Penulisan Huruf Arab
HURUF/ FRASA ARABBAHASA LATINKODE UNICODE
AllahFDF2
AkbarFDF3
MuhammadFDF4
 SAWFDF5
RasulFDF6
‘AlaihFDF7
Wa SallamFDF8
ShollaFDF9
ShollaFDF0
QalaFDF1
Shollallohu ‘Alaih wa SallamFDFA
JallajallahuFDFB
RiyalFDFC
بِسْمِ اللّٰهِ الرَّحْمٰنِ الرَحِيْمِBismillahirahmanirrahimFDFD
،Koma (Arab) 060C
 ؍ Tanggal Pemisah (Arab) 060D
 ؎  Tanda Ayat Syair (Arab) 060E
 ؏   Tanda Mishra (Arab) 060F
 ؟   Tanda Tanya (Arab) 061F
 ٭   Tanda Bintang Lima (Arab) 066D
  ۝  Akhir Ayat (Arab) 06DD
 ۞  Tanda Permulaan Hizb (Arab) 06DE
 ۩  Tanda Ayat Sajdah 06E9
   Tanda Kurung Kiri (Arab) FD3E
 ﴿ Tanda Kurung Kanan (Arab) FD3F
Share:

Senin, 02 Desember 2019

Mengelola Database MySQL Dengan MS Access Praktek Pembuatan Data Kop Surat Pengiriman

Microsoft access mudah digunakan tapi memiliki kekurangan dalam ukuran database yang hanya mampu menyimpan data sebesar 2 Gb. Untuk itu diperlukan MySQL untuk penyimpanan datanya. Berikut akan sedikit sharing cara-cara koneksi Microsoft Access dengan MySQL dan latihan pembuatan kop surat untuk pengiriman buku. Semoga bermanfaat.

1. Pertama install Xampp

2. Kemudian running Apache dan MySQL

3. Download dan install mysql connector odbc 8.0.18 winx64


4. Buka phpMyadmin dengan cara ketik http://localhost/phpmyadmin

5. Create database baru

6. Buat tabel baru 

7. Isikan nama field, type data, dan pilih primary key pada field ID kemudian tekan GO


8. Maka akan muncul tampilan seperti dibawah ini:

9. Data penerima, alamat, telp, jumlah dll masih kosong

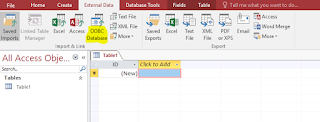
10. Buka Ms Access pilih blank database

11. Pilih ODBC database

12. Pilih link to the data source

13. Pilih Machine data source kemudian pilih NEW

14. Pilih user data source

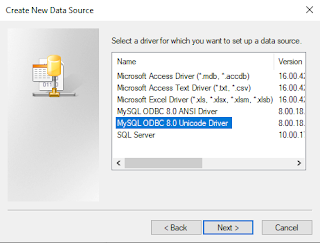
15. Pilih MySQL ODBC 8.0 Unicode Driver

16. Pilih Finish

17. Wajib isi user dengan Root seperti dibawah ini:

18. Pilih latihan (data source name yang telah dibuat)

19. Pilih nama tabel yang telah dibuat pada MySQL

20. Tabel MySQL sudah terhubung dengan Ms Access
21. Isi Data Pengiriman
22. Buat report 
23. Buat design report dengan menggunakan label dan text box


24. Pada data penerima pilih penerima
25. Pilih report view
26. Sesuaikan ukuran kertas
27. Pilih tampilan landscape
28. Export to pdf
29. Pilih ukuran standar pdf
30. Selesai semoga bermanfaat


Share:

Rabu, 23 Oktober 2019

Cara membuat polygon sawah dari banyak line menggunakan Qgis

1. Buka file shp line yang akan di convert ke poligon, contoh seperti dibawah ini:
2. Klik processing kemudian toolbox untuk menampilkan Processing Toolbox kemudian searching vitur polygonize seperti gambar dibawah ini:


3. Akan muncul tampilan Polygonize seperti dibawah ini:


Pada input layer, pilih layer yang akan diubah menjadi polygon.
Pada Polygon from line, pilih save to file untuk menyimpan file hasil polygon nya.

4. Hasilnya:


Share:

More Services

Diberdayakan oleh Blogger.

Like on Facebook

Popular Posts

Recent Posts

Unordered List

Pages

Theme Support